| 使用Python创建websocket服务和客户端请求 | 您所在的位置:网站首页 › websocket 菜鸟教程 › 使用Python创建websocket服务和客户端请求 |
使用Python创建websocket服务和客户端请求
|
1 WebSocket是啥
本段来自 菜鸟教程-WebSocket。 WebSocket 和HTTP一样,也是一种通讯协议,允许服务端主动向客户端推送数据。 在 WebSocket API 中,浏览器和服务器只需要完成一次握手,两者之间就直接可以创建持久性的连接,并进行双向数据传输。 有很多网站为了实现推送技术,所用的技术都是 Ajax 轮询。轮询是在特定的的时间间隔(如每1秒),由浏览器对服务器发出HTTP请求,然后由服务器返回最新的数据给客户端的浏览器。这种传统的模式带来很明显的缺点,即浏览器需要不断的向服务器发出请求,然而HTTP请求可能包含较长的头部,其中真正有效的数据可能只是很小的一部分,显然这样会浪费很多的带宽等资源。 HTML5 定义的 WebSocket 协议,能更好的节省服务器资源和带宽,并且能够更实时地进行通讯。 2 WebSocket的C/S架构
Python websockets是用于在Python中构建WebSocket服务器和客户端的库,它基于asyncio异步IO建立,提供基于协程的API。 请尽量使用Python≥3.6以上版本来运行websockets。 安装websockets: pip3 install websockets主要用到的API有: websockets.connect() websockets.send() websockets.recv() 4 简单例子server.py,用于构建websocket服务器,在本地8765端口启动,会将接收到的消息加上I got your message:返回回去。 import asyncio import websockets async def echo(websocket, path): async for message in websocket: message = "I got your message: {}".format(message) await websocket.send(message) asyncio.get_event_loop().run_until_complete(websockets.serve(echo, 'localhost', 8765)) asyncio.get_event_loop().run_forever()client.py和指定url建立websocket连接,并发送消息,然后等待接收消息,并将消息打印出来。 import asyncio import websockets async def hello(uri): async with websockets.connect(uri) as websocket: await websocket.send("Hello world!") recv_text = await websocket.recv() print(recv_text) asyncio.get_event_loop().run_until_complete( hello('ws://localhost:8765'))先执行server.py,再执行client.py,client.py的输出结果如下: I got your message: Hello world! 5 主动发消息建立连接之后,客户端可以随时接收服务器发来的消息。服务器可以依据逻辑,给客户端推送指定消息。 服务器和客户端代码会有一点变化,在服务器回完第一条消息之后,开始轮询时间,当秒数达到0的时候,会主动给客户端回一条消息。 server.py: import asyncio import websockets import time async def echo(websocket, path): async for message in websocket: message = "I got your message: {}".format(message) await websocket.send(message) while True: t = time.strftime("%Y-%m-%d %H:%M:%S", time.localtime()) if str(t).endswith("0"): await websocket.send(t) break asyncio.get_event_loop().run_until_complete( websockets.serve(echo, 'localhost', 8765)) asyncio.get_event_loop().run_forever()client.py: import asyncio import websockets async def hello(uri): async with websockets.connect(uri) as websocket: await websocket.send("Hello world!") print("< Hello world!") while True: recv_text = await websocket.recv() print("> {}".format(recv_text)) asyncio.get_event_loop().run_until_complete( hello('ws://localhost:8765'))先执行server.py,再执行client.py,client.py的输出结果如下: < Hello world! > I got your message: Hello world! > 2020-05-29 15:11:50最后一条消息则是服务端主动给客户端发送的。 6 在浏览器上使用如何在前端发送websocket请求呢? 看这段代码,先建立连接,然后向服务端发送Hello world,然后把接收到的所有消息依次展示出来。 websocket通信客户端 function WebSocketTest() { if ("WebSocket" in window) { // 打开一个 web socket var ws = new WebSocket("ws://127.0.0.1:8765"); // 连接建立后的回调函数 ws.onopen = function () { // Web Socket 已连接上,使用 send() 方法发送数据 ws.send("Hello world!"); $("#main").append("" + " |
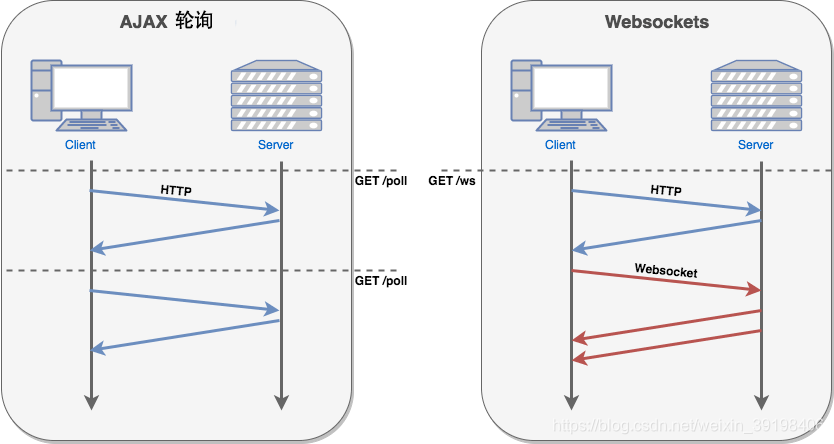 在服务端启动接收WebSocket请求的服务,客户端建立Websocket连接并发送请求(Message),服务端接收后,就可以根据处理逻辑,按需向客户端发送消息了,例如发送主动推送。
【本文地址】